2021. szeptember 27.

Linux Amiga is still alive... (2.)

My target was a very small Linux on Amiga, so I decided to go for it with embedded profile, and some other features to considire:

  • Use MUSL instead of GNU glibc
  • Use BusyBox instead of fat user-land
  • Use OpenRC for full extent (to substitute sysvinit as well)
  • Omit Gentoo packaging, and compilers, and build dependencies all together
  • Use OpenRC to switch features on-off
  • Still wanted to use bash

To begin with, musl and glibc is mutually hate each other. My host is an ordinary x64 GNU Gentoo install, and according to my experience, cross-compiling still uses host's make.config. So, not to mess up my host, created a chroot (1st step) from a downloaded stage3 tarball.

I chose i686-pc-linux-musl, for two reasons: the target m68k architecture is also 32bit, and it is compiled and configured to use musl; no expected clash between C libraries here.

One thing to remember, when you chroot into i686 root, is to also run linux32 command, to switch environment, and calling conventions to 32 bit (will make some not so well written autoconfigs happy, and compile everything successfully). Also, since I have 32GB RAM, mounted tmpfs with confidence to /var/tmp to make emerges way faster, and bind mounted /var/db/repos/gentoo, /var/cache/distfiles from host (not to waste much disk).

An optional step (I like this in BTRFS), you create a snapshot of your chroot, if you created in a subvolum. Also, later it makes easier, if you just create a subvolume usr/m68k-unknown-linux-musl relative to your chroot:

$ btrfs subvol create usr/m68k-unknown-linux-musl

Update the chroot (inside) as usual: emerge -uaD @world, and it is a good environment to start.

The next thing one will need, is crossdev packaged: emerge -a crossdev.

Then, we need the crossdev tools for m68k (looked up the recent stable releases for other arch):

$ crossdev --b 2.37_p1 --g 10.3.0-r2 --k 5.10 --l 1.2.2-r3 -t m68k-unknown-linux-musl

This will take a while, but in the end, you should have a working cross-gcc and some starting folder structure under /usr/m68k-unknown-linux-musl, just like /etc/portage/ folder, with a minimal set included here.

Here comes the first magic: crossdev environment is linked to the embedded profile by default. But, you can change that, by providing a symlink to a different one. The only thing is: there is no m68k default musl profile. So, what I did, is actually not symlinking a profile, but created a directory make.profile under /etc/portage, and added 2 files:

$ echo "5" > /usr/m68k-unknown-linux-musl/etc/portage/make.profile/eapi
$ touch /usr/m68k-unknown-linux-musl/etc/portage/make.profile/parent

And edited the parent file to contain this:

/var/db/repos/gentoo/profiles/default/linux/m68k/17.0
/var/db/repos/gentoo/profiles/default/linux/musl
/var/db/repos/gentoo/profiles/features/musl

Ofc. portage will complain every time about the profile is not being a symlink, but let's just ignore it. Also needed to fintune a bit the make.conf to contain the proper CPU arch already, and the accpet keywords (on top of the necessary use flags):

ACCEPT_KEYWORDS="m68k -~m68k *"
COMMON_FLAGS="-Os -pipe -fomit-frame-pointer -march=68030"

Time to build

Now it's time to call the crossbuilder:

$ m68k-unknown-linux-musl-emerge -auND --keep-going @world

This will start to cross-build a default install into usr/m68k-unknown-linux-musl

Get some rest, to be continued... Spoiler alert!! You will have some build errors, an no working emerge inside!

Some words about the accept keywords

One can observe, that packages tend to have architecture stable (fe: "amd64"), and unstable/testing (fe.: "~amd64") keywords. And there are some ancient architectures, where Gentoo doesn't maintain anymore stable packages. Some of them are: mips, alpha, and m68k is being one of them, all packages are marked as unstable, aka ~mips, ~alpha, ~m68k.

Now, the trouble is, if one defines unconditionally "~m68k", portage will install the latest, even untested, cutting edge version of the packages (even marked unstable on ~amd64, ~x86, ~arm!). This is a good way for asking some more trouble, then we need.

Fortunately, there is a "*" for accepting, which means: "the highest version of packages, for which exists at least one stable architecture". So, by defining "*" and removing "~m68k" from the picture (with "-~m68k"), we are practically targeting packages, which ones are already tried out, tested, and stable on at least a different platform. The chances are minimal, for collisions, etc... Also, you don't need to define package masks to constraint version, and update those manually, later an automatic update will most probably just work.

2021. szeptember 25.

Linux Amiga is still alive... just nobody cares (1.)


If you ever wondered, what happened to those architecture supports, which were there in Linux, then the answer is twofold: some of them was wiped out, some of them are still there. For those, that are still there, you can imagine that are tested less and less on real hardware.

One of them, is Linux m68k port, for Motorola 680{2|3|4|6}0 CPUs, with MMU (Memory Management Unit). Amiga is exactly one of them. I have a nice Amiga 2000, with A2630 CPU card (containing 68030, with math CPU as well), running on a zipping 25 MHz. Also have SCSI card, disc, some Memory expansion. I was wondering: can Linux still run on this machine? Despite the fact, that there is no recent distro publishing to this ancient architecture. Yes, ancient. The first Linux port to Amiga was released in 1993. Today, in 2021, it's 28 years old. That time, the kernel was 0.9, now 5.10 (stable). It was in fact the first stable port of the Linux kernel to a different architecture, a little bit predating Alpha, the first official port. So, I needed to compile a linux distro for myself.


The goal

  • Be as memory friendly, as possible (now considered as embedded)
  • Consume no more disk space than 512 MByte
  • Use as many capabilities of Amiga as possible

The tools I used

  • AMD Ryzen 3600 (12 cores, 4GHz), 32 GB RAM (for resources)
  • Gentoo Linux x86_64 (as host OS)
  • Qemu-m68k (user mode linux) (as a tool to "native" compile things)
  • chroot (a lot) (as a means to separate systems + install new ones)
  • WinUAE (to test)


The process

  1. Install i686-pc-linux-musl into a chroot on the host
  2. Install crossdev into i686-..-musl, and cross compile a kind of stage3 for m68k-unkown-linux-musl
  3. Inside the m68k-..-musl chroot recompile everything
  4. In the m68k-..-musl chroot configure and install needed packages on Amiga Linux
  5. From the m68k-..-musl, create prefix directory, with embedded profile
  6. From the m68k-..-musl, install all required packages into the prefix
  7. Chroot into the prefix, and finish up install/configuration of the environment just like you would do on a fresh install
  8. In m68k-..-musl set and compile a kernel and install into the prefix
  9. Create a WinUAE usable disk image, with Amiga boot partition, and amiboot-5.6, configure amiboot
  10. Try it out under WinUAE, and fix things not working
  11. Go to 6


2019. november 21.

Recent linux on 20+ years old unix machine 2.

What is BTRFS? Why BTRFS? What do I love about BTRFS?

Well, it a file system, much like any other one. You can format a disk partition with it, and put files, read files, etc... It is quite new also, compared to f.e. ext2, or FAT32. The gotcha is: it knows much more, than just keeping files on disk. Elsewhere you can read a lot about it, but in a nutshell:
- You can create snapshots of your filesystem
- You can make software raid easily, on the the fly
- You can ship snapshots, and even differential snapshot from one machine to another

I especially love the snapshot, and snapshot shipping feature of it. If you think about it: it makes life much easier in several ways. During making a system wide backup, moving to an other machine, using to chroot into it, update it, restoring it in case something goes wrong... etc.

I found it particularly useful BTRFS in the Qemu scenario, since I was able to copy the ready system to the actual hardware, and also send changes back under Qemu, to do more install work on it (which means compiling).

Apart from being an awesome distro, Gentoo has a nice feature: you can actually build binary packages (yourself). This makes installation much faster on slower machines. For that, I used NFS to share ready built packages from Qemu host system to the PWS, and also distfiles, and the whole portage.

First gotcha: sharing the binary packages over a read-write manner (f.e. over nfs) is a must, since as we will see, there are packages, which can only be built on the real hardware itself. However, they are dependencies for other packages, so even the build machine needs binary packages from time to time, to be able to proceed with other builds.

What I also like about Gentoo, is it's great documentation. I used mainly this article to set up user mode qemu system. A very quick overview on what you can achieve with it: make your system recognize Alpha CPU targeted binary files, and use user mode qemu to translate it to x86 instructions in real time. And you do it, in a chroot environment, which is practically the way, how you install Gentoo to a new system. Nice, and sound! :) So I chrooted into an Alpha stage3 filesystem, carefully created on a BTRFS subvolume (to make it easily portable later on), and... almost nothing worked. Actually bash worked, so at least I had a command line, running on virtual Alpha CPU.

Second gotcha: on all sites, the bin format misc magic header's mask is incorrect. You have to modify to this one:

# echo ':alpha:M::\x7fELF\x02\x01\x01\x00\x00\x00\x00\x00
\x00\x00\x00\x00\x02\x00\x26\x90:\xff\xff\xff\xff\xff\xfe
\xfe\x00\xff\xff\xff\xff\xff\xff\xff\xff\xfe\xff\xff\xff:
/bin/qemu-alpha:' > /proc/sys/fs/binfmt_misc/register

Do you see the red bold part, it is originally FF everywhere I saw. Without it, more modern linux elfs are not working, only SYSV compatible ones. An other hard to find hint: if you
if you echo /proc/sys/fs/binfmt_misc/status, 1= enable, 0=disable, -1=clear

The last one is not very much documented anywhere, however if you need to give a new path, you can now clear the binfmt_misc registrations to make it happen.

Third gotcha: Gentoo uses python a lot, since it's packaging system is written in it. It also has at least two different version of it on every system as of now: v2.7 & 3.6. The v3.6 throws exceptions all around, so building is not working. However if you eselect python set , it works like charm, and you are good to go, and emerge (install/compile) some packages. Well, at least almost, 'cause you will soon find out, still nothing works.

Fourth gotcha: emerge is getting more and more secure. It drops privileges while compiles, creates sandbox, network sandbox, stc around the compiling and installing process. However, there is still some missing functions in qemu (v4.1) kernel bridge, which prevents to use such things, so you have to add to your /etc/portage/make.conf some FEATURE definitions:
FEATURES="-sandbox -pid-sandbox -network-sandbox -ipc-sandbox"
Actually this disables some feature. Removing those features, starts to work! And you can build binary packages, to make it later available for your native hardware.

Fifth gotcha: if you compile in the chroot big packages, like gcc, kernel, etc, you should set in the shell before chrooting into it:
# ulimit -n 15000
Not to get such errors, like "too many open files"... when only just a little would have needed to complet the many hours package compile.

Sixth gotcha: anything, that is dependent on cmake, or cmake itself, fails to compile with Illegal Instruction. There must be some bug in qemu. Actually I found some other programs causing unexpected errors, like subversion client, which segmentation faults, but unlike cmake, it is not required to build packages. To still make building happen: you have to build cmake dependent packages on your native machine. Fortunately, with the help of equery command it is quite easy to collect those packages which are directly dependent on cmake. I even wrote a script, which creates a @cmake set for me, to be able to issue such command on the native machine:
# emerge --update --newuse --oneshot --buildpkgonly @cmake
Which builds/updates only the cmake dependent packages, doesn't install those yet (since could cause conflicts), but creates a binary package out of those. On the qemu system, when I update @world, those will be install from binary, et vois la! emerge dependecy graph is satisfied. Later, when all builds are ready, the native system just need to install binary packages. Actually, this is why nfs is a good idea to store/share binary packages between host (I use kerberized NFS4 with integrity check).


2019. november 16.

Recent linux on 20+ years old unix machine 1.

I have made an excursion to the Unix realms recently, with the help of a Compaq PeronalWorkstation (PWS) 500au. It was a dream machine back in '96 when it hit the market, with 500MHz EV56 Alpha CPU, 512 MByte of RAM, built-in SCSI, USB, sound card, and IDE. My machine also contains an old school, high-end graphical card: Intergraph Intense 3D.

Tru64 runs like charm on it, and uses the display card well. Windows 2000 also has a driver for it (I haven't tried it out yet). But I wanted to give a shot with a modern desktop OS as well, and here came Linux to save me.

I thought there are many recent distros supporting alpha architecture, but it turned out my only practical choice can Gentoo be, all others have long ago dropped their support. So Gentoo let it be! What you need to know about Gentoo, is practically you have to install everything from sources, which means compiling. A lot of compiling... and even more!

You also need to know, that this old machine, with it's single 500MHz CPU takes it's time when it comes to compiling such big things, like Linux kernel... more than 18 hours! That much. So, compiling X, and all of it's dependencies, and a media player, and configuring everything, was out of reach practically.

I also wanted to keep the nice, big, expensive graphic card in there, to use Tru64, and later even Windows 2000. However, since it was a high-end (and very expensive) card back at it's days, it unfortunately lacks any linux support and drivers. But this in itself a complete story of it's own right.

What I choose to do, is set up Qemu user land emulation of Alpha (AXP) CPU on mu laptop (x86-64, 4 cores, 16GByte RAM), put this stage3 Alpha tarball into my other Gentoo disk, chroot into it, install and configured everything I wanted to have a starting system on the PWS, then copied the image to it, and boot up. It's quite simple to say, but I had some headache during the process, bumping into barriers here and there.

In the end, I ended up with a recent Linux, with a recent kernel (Linux snow 4.19.66-gentoo-snow-09 #8 Sat Nov 16 09:35:25 CET 2019 alpha EV56 Miata GNU/Linux), with Xorg running in 1024x768 with LXDE, with all working peripheries: sound, display, IDE, SCSI, Lan, and more...

In the next chapters, I will describe the gotchas till I got here.

2015. október 21.

Miegymás, a helikipterekkel


Új hordozó, dupla élvezet!
Mostanra már 20+ nettó repült időt töltöttem a levegőben WLToys V911-Pro-val. Ez alatt az idő alatt összeszedtem némi tapasztalatot, amit érdemesnek gondoltam megosztani. Érdekes módon, a 3 csatornás helikopterhez is másképp viszonyulok azóta.

Például: rájöttem, hogy a rotor lapát kiegyensúlyozás sokat segít abban, hogy a gép ne rázza szét magát. Ennek a titka:
1.) először az egyes lapátok tömegközéppontját kell megtalálni.
2.) ha a két lapáté eltérő (1mm-nél nagyobb az eltérés), kicsi ragasztó csíkokkal (én celluxot használtam) egyforma helyre kell hozni (a lapát tengelyhez közeli részére)
3.) az egész rotort ismételten ki kell együtt egyensúlyozni úgy, hogy a könnyebb lapát tömegközéppontjára ragasztunk megfelelő méretű csíkot.

A tömegközéppont helye a penge éle
Ha ezzel az ember eljátszadozik egy kicsit, a madárka sokkalta szebben repül. Igen, a 3 csatornás is, amiről a képek készültek. Arra amúgy is ráfért egy szétszedés-összerakás, mivel egy becsapódás után a külső tengely fogaskereke és felső része eltávolodott egymástól, amitől ki tudott mozdulni a felső csapágy repülés közben, iszonyatos rángatózást, rázkódást okozva. Az illesztés helyrerakása után pici pillanatragasztóval be is rögzítettem a dolgokat, hogy legközelebb ne csússzon szét. A végeredmény? A kérdés az volt ezután, hogy idáig egyáltalán hogy tudott repülni szegény gép?? Még a múltkori "szervízt" is simán felülmúlta a hatás. Nincs holtjáték + kiegyensúlyozott forgó tömegek = vajsima járás.

Ki van egyensúlyozva (statikusan)
A V911 lapátjait is kiegyensúlyoztam, illetve amikor később cseréltem eleve úgy válogattam össze a két lapátot, hogy egyformák legyenek. Ez is sokat segített.

A V911-essel már kezdtem belejönni a dologba, amikor is az egyszerre repülhető idő nagyon rövid lett (4x 7-8 perc), viszont sok időt vett igénybe (minden repülés után 4 perc pihi, hogy a gép visszahüljön). Kb 45 perc kellett 30 perc repüléshez, egy alkalommal, amire egy nap max egyszer nyílik lehetőségem. Növelni kellett a hatékonyságon, hogy gyorsabban tanuljak: vettem még 2 db 200 mAh-ás "tuning" aksit, illetve még egy gépet. A két gépet felváltva röptetve, mindig kellően vissza tudnak hűlni két repülés között, így a motorok élettartama várhatóan nem rövidül olyan rohamosan (kefék pl. jobban kopnak melegen, a beépített csúszó csapágyak is, stb...). Így már 50 perc alatt 45 percet tudok egyszerre repülni.

Centírozó cellux a szárny alján
Na igen ám, de közben a kis bestiákon apró változtatások is történtek (mindketten megkapták a tuning szettet):
- Közép szemes imbolygótárcsa, a precízebb irányíthatóságért
- Carbon főtengely, a kisebb súlyért (-1 gramm hopp...)
- Lefelé hajlított főrotorok, a hatékonyabb felhajtóerőért (a levegőben feszül ki vízszintesre)
- Rövidebb, könnyebb, áramvonalas hiller tengely az agilisebb (és kisebb inga-) mozgásért
Holtjátékok megszűntetése sokat segít

És ami a legnagyobbat dobta az élményen: lecseréltem a távirányítót egy Turnigy 9X-re, amiben az ER9X OpenSource firmware található. Teljesen rászabtam a távirányítót a két jószágra. Sokkal precízebb irányíthatóságot kaptam, a szervók érzékenységét pedig nem kettő, hanem három fokozatban tudom állítani. A repült időket a beépített stopperrel méri, a visszaszámlálóval meg a használt motorteljesítmény függvényében jelez hogy kb mikor fogy ki a power az aksiból.

Eltör, ragaszt, eltör, ragaszt, eltör, csere
A repnapló segítségével nyomon tudom követni mind az aksik erejét, mind a zuhanások számát, mind a gépek működési idejét, valamint következtetni tudok arra, hogy hogy fejlődök (ha a zuhanások számának csökkenését nézem). Hasznos dolog. :)

Repedt, és kopott... csere.
Azonban voltak közben törések. Rotorlapátot az előző postom óta is törtem. Ez ilyen fogyó eszköz. Viszont sikerült a landoló talpat is eltörni, amit többször próbáltam ragasztani, de mindig ugyanott adta meg magát. A pillanatragasztó csak ideiglenes legoldás ilyenre, viszont anélkül is működik (csak a rezgése miatt hangosabb a gép). Sikerült eltörni a burkolatot is, a hátsó rögzítő szemek körül (azt pontosan nem tudom hogyan, egyszer csak szét volt repedve). És végül, két szék közé teljes lendülettel beszállva, a főtengely felső fejéről a rotorlapátokat rögzítő bütyköket is letörtem. Kész szerencse, hogy ezek amolyan filléres (száz forintos) tételek.


A jobb oldali itt még gyári
A második gép ilyenkor is segít, hiszen amíg az egyik betegeskedik, addig sem vagyok teljesen a földhöz szögelve, és a repülés folytatódhat... Már csak meg kellett oldani, hogy egy dobozba beférjen mindkét gép. Ehhez egy hungarocell darabot faragtam (nagy szemetelés árán) méretre, ahogy az első képen is látható. A távirányítónak van saját hungarocell tartója, így két darabos lett a szett.

Alu és carbon főtengely... de az csavar???
A világító búra nagyon bejött! Áldom az eszemet, hogy megcsináltam! Sokkal-sokkal jobban látszik a gép még félhomályban is, és nagyon könnyű eldönteni, merre felé áll az orra. Gyakorolni néha plázák üres mélygarázsában is szoktam, ami nem az az agyonvilágított hely. Viszont, időjárás védett, és mégis nagy (csak fölfelé nem az). A többszöri ütközés következtében azonban a kicsi SMD ellenállás forrasztása többször is levált, végül meguntam, és sima THT ellenállást kötöttem sorba a LED-re. A második példány is magátol értetődően megkapta a moddot.

2015. augusztus 29.

Mikro heli pimpelés

Az új helikpteremen hiányzott nekem, hogy félhomályban, ha messze van, nem tudom rendesen megítélni hogy pontosan merre felé is néz a gép orra. Ezért a tartalék három csatornás gép egyik fehér LED-jét, a hozzá tartozó ellenállással ráforrasztottam a nyákra, hogy belülről kivilágítsa a kabint. Ami a képen nem nagyon látszik, az a kb LED láb átmérőjű SMD ellenállás, amit a láb meghosszabbításaként kihajlítva a negatív pólushoz csatlakoztattam. Itt a tűhegyes csipeszem jó szolgálatot tett.

A gépet éjszaka még ki is próbáltam gyorsan a kertben (csak a járda van megvilágítva gyéren, a füves terület már nem kap fényt), és nagyon elégedett vagyok az eredménnyel. Plusz hozomány, hogyha a fűben landolok (véletlenül), könnyű megtalálni a sötétben. Beltérben is, a nem annyira jól megvilágított sarkokban is könnyen felismerhető a gép pozíciója, így az irányítása könnyebbé vált (már ami az orientáció felismerését illeti).

Másik érdekesség: a szárnyakról a fekete WARNING feliratot sikerült lemosni, ehhez csak papírzsepi + aceton mentes körömlakklemosóra volt szükség, plusz némi dörzsölésre, és türelemre. A szélén a színes mintát is oldja a cucc, így azt én celluxxal kimaszkoltam a művelet előtt, mivel meg akartam tartani.

És ha már úgy is benne voltam a barkácsolásban, megcsináltam a távirányító halkabra állítását is, az itt talált leírás alapján: http://microrc.hu/tuning.html

2015. augusztus 24.

Kategóriát léptem

Helikopterezésben. Többféle szempontból is. Vettem egy WLToys V911 pro-t, a hétvégén, hogy egy kicsi, de olcsó lépést tegyek a 6 csatornás helikopter felé. Az irányítás elsajátítására ezért egy olcsó 4 csatornás gép jó döntés volt, főleg amikor a ház falának csaptam kb 40 km/h-val.

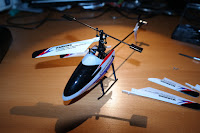
Ez a 4 csatornás helikopter, ahogy a képen is látszik, már csak szimpla rotorral rendelkezik, és egy rendes farok rotorral, mint az igazi helikopterek. Ámde, a ciklikusa azokénál sokkalta egyszerűbb: itt ugyanis gyakorlatilag súlypont áthelyezéssel történik az irányítás, vagyis a fix állásszögű rotorlapátokat dönti előre-hátra, illetve jobbra-balra. A hátsó, vízszintesen forgó farokrotorral folyamatosan kiegyenlíti a főrotor légellenállásából származó forgatónyomatékot, amit egy pici elektronikus giroszkóp vezérel. A jobbra-balra forgást a függőleges tengely körül ennek a farok rotornak a sebesség változtatásával oldja meg. Az emlekedés-sűlyedés szintén a főrotor fordulatszámának szabályozásával történik, mint a korábbi, 3 csatornás koaxiális helikopternél.

A vezérlés oldalán egy új irány jött be a képbe, amit meg kell tanulnom, valamint a sokkal gyorsabb reakció a parancsaimra, és a hihetetlen sebesség, amit ez a kis gyösz el tud érni. Mindezekkel együtt viszont sokkal finomabban, és pontosabban irányítható, valamint az infra távvezérlő helyett egy rendes(ebb) rádió távirányítónak hála, szabadban is alkalmazható (nem zavar be más TV távirányítója, vagy a nap hősugárzása).

Érdekesség még, hogy a 3 csatornás koax rotoros 42g-ot nyom, addig az új 4 csatornás, egy főrotoros 33g-ot, aksival együtt, annak ellenére, hogy vagy 4-5 cm-el hosszabb, és a rotor átmérője is vagy 2 cm-rel nagyobb.

Sajnos, amikor kibontottam, több apróságba is belebotlottam: az egyik aksi is kontakt hibás volt, és maga a távirányító is. Szerencsére ez utóbbi csak éppen kis sebességű, fű fölötti repülés közben okozott kontrollálatlan zuhanást. Természetesen, amikor visszavittem a boltba, azonnal cserélték minden gond nélkül ezeket. Ezen kívül ajánlottak egy "tuning" flybar-t is (az a kicsi röpsúlyos izé, ami a rotorlapátok állásszögének változását csillapítja), amit meg is vettem (+1000 Ft). Ugyanis én is tapasztaltam, hogy a gyári, hirtelen irányváltásoknál hajlamos belecsapni a kasztniba, illetve elég lomhává teszi a gyors, precíz manővereket.

Gyakoroltam kicsit a szemben lebegést (azt hittem triviális, de nem), meg repkedtem vele ide-oda, nyolcasokat leírva. Már úgy gondoltam, hogy hű de jól megy, amikor kicsit benéztem a gép és a ház fala közti távolságot, ráadásul pont rosz irányba is próbáltam korrigálni (a ház fala felé), és csatt! Oda az egyik főrotor lapát. A szett szerencsére tartalmaz két tartalékot, kb 10 perces munkával ki is cseréltem. Lehet újra repülni. Tényleg nem semmi, mit bír ez a kis gép... :)